
The reason for this post is that I was working in K8studio, a Kubernetes UI that I’m working on, and I was trying to read the network policies of a Kubernetes cluster to understand which pods — and by extension, which workloads — were affected by the existing policies.
I was working on my unit tests to ensure I was correctly linking the right network policies to the appropriate workloads. I initially thought it would be an easy task, but I ended up with a unit test containing over 120 test cases.
Figuring out how a network policy affects the Kubernetes network and understanding what the policy actually does can be trickier than it seems. And that’s a real issue because network policies are like our firewalls — they’re one of the main tools we use to secure a cluster. By default, Kubernetes allows everything to connect to everything, which is a nightmare for any DevSecOps team.
So, understanding what each network policy does individually, and how they all work together, is key to having confidence that only the workloads needing access are allowed to communicate and that we are are restrictive as possible, so if a hacker takes control of a container in our cluster it can not communicate freely with the rest of the containers running on the cluster.
So I’m going to share with you some of the things I find out while doing the unit test.
Let’s take a look at this network policy:
apiVersion: networking.k8s.io/v1
kind: NetworkPolicy
metadata:
  name: multi-port-egress  namespace: default
spec:
  podSelector:
    matchLabels:
      role: db
  policyTypes:
    - Egress
  egress:
    - to:
        - ipBlock:
            cidr: 10.0.0.0/24
      ports:
        - protocol: TCP
          port: 32000
          endPort: 32768
How can we find out what pods get affected by a network policy?
First, notice that a network policy has a namespace. That means the policy only applies to pods within that same namespace. So in a normal Kubernetes cluster we can not do a global network policy, think that could be quite handy,
However:
- Some CNI plugins like Calico or Cilium support cluster-wide policies or global policies.
- In Calico, you can use GlobalNetworkPolicy to apply policies across namespaces.
- In Cilium, you can use CiliumClusterwideNetworkPolicy.
In my opinion if you are serious about networking speed and security, using a proper CNI is key, Doing Global network policies are really useful to set base and common rules.Really, I personally really like Calico …
In our example, the policy is in the default namespace—only pods in that namespace are affected, regardless of their labels or anything else.
Ok so that’s it for the namespace let's take a look at the podSelector property. This is how the policy chooses which pods in the namespace it applies to. In our case:
podSelector:
  matchLabels:
    role: db
This means only pods with the label role=db in the default namespace will be selected and affected by this policy. If a pod doesn’t have that label, even if it's in the same namespace, it won’t be touched by this policy.
So remember if the pod does not have a label we can not apply a network policy that only affect this pod
Now, here’s where things get interesting — and honestly, where I lost some time while writing the unit tests. The podSelector can be used in a few different ways, and each one changes what gets matched.
podSelector: {} Selects All Pods in the Namespace
If you want your policy to apply to every pod in the namespace, you can just set the podSelector to an empty object like this:
podSelector: {}Selects All Pods in the Namespace
This is valid and very useful when you want to enforce something cluster-wide (within a namespace), like denying all ingress traffic by default. I found myself needing this in test cases where I wanted to simulate very strict environments.
podSelector with matchLabels
This is the usual case, where you’re targeting a specific group of pods using exact label matches. For example:
matchLabels:
  app: frontend
  environment: prod
This will only match pods that have both of those labels exactly. Super useful when you’re trying to isolate traffic for a very specific tier of your application. But let’s be more accurate, the pos needs to have these two labels but it can have more.
Let’s say you have a NetworkPolicy like this:
podSelector:
  matchLabels:
    app: frontend
Let’s say we have these pods:
# pod A
labels:
  app: frontend

# pod B
labels:
  app: frontend
  env: prod

# pod C
labels:
  app: backend
env: prod- Pod A matches → app=frontend
- Pod B matches → app=frontend (extra label doesn't affect matching)
- Pod C does not match → wrong value for app
matchExpressions More Complex Label Logic
if you need to create a more complex query you can use matchExpressions comes in:
matchExpressions:
  - key: app
    operator: In
    values:
      - frontend
      - backend
  - key: environment
    operator: NotIn
    values:
      - staging
This selects pods that have app=frontend or app=backend, but not if they’re in the staging environment. This turned out to be super useful in test scenarios where I wanted a single policy to apply to several services, but exclude a subset based on environment or deployment stage.
What Happens If You Omit podSelector?
You can’t. Kubernetes requires podSelector to be present in every NetworkPolicy. If it's missing or null, the policy is invalid and won’t be applied at all. That was a gotcha I hit early in my tests—some YAML templates were generating incomplete policies.
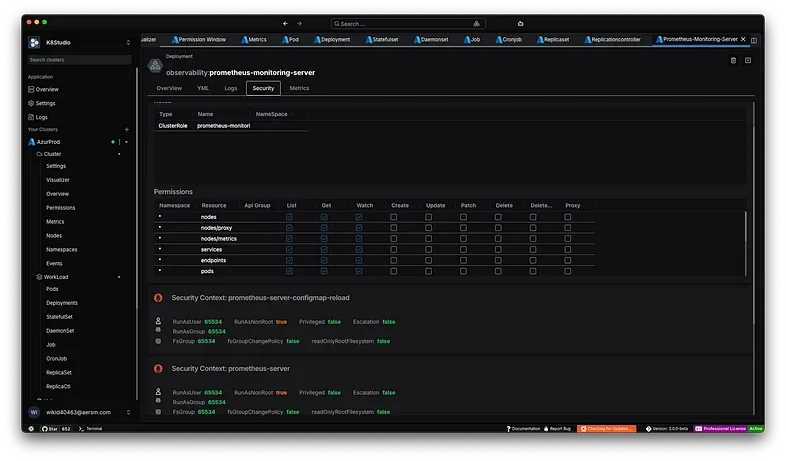
One thing I find particularly challenging is understanding how network policies are applied and gaining a clear, global view of which parts of the cluster are protected and which are still unrestricted. That is one of the reasons I decided to start implementing some kind of solution in k8studio.
So we decided to do 2 things:
1.Using Cloudmaps we added a section to show if a workload was restricted or allowed traffic.
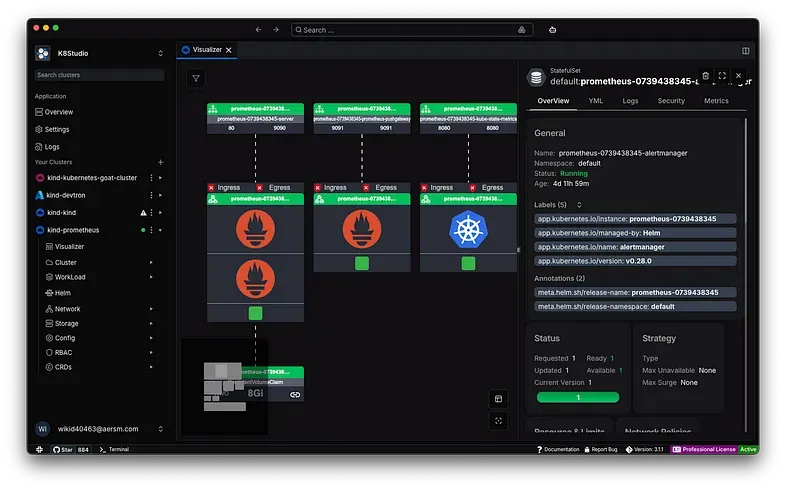
2. We added a section one section in the workload selection called security that gives us all the network policies that are applied in a workload.
In Part 2 I will talk more about ingress and egress and all my findings.